Airspeed Indicator: Essential Pilot Guide to Safe Flight
Oct 16, 2024Understanding Airspeed Indicators
The airspeed indicator is key to a safe flight by giving the pilot accurate speed data. It measures the aircraft speed in knots.
Easy to read and understand it helps the pilot make quick decisions to keep the flight safe and efficient. Along with the airspeed indicator, the Turn Coordinator is another essential instrument that aids pilots in maintaining control during flight maneuvers.
The airspeed indicator is the only flight instrument that uses both static and pitot systems, making it a key component of the 6 Pack Flight Instruments.
The static system provides pressure information, and the pitot system measures the ram air pressure in the moving airflow so it can give precise readings.
This dual system operation makes it reliable and critical in aircraft instrumentation.
Before the aircraft takes off you need to check the airspeed indicator to make sure it’s at zero. During takeoff the pilot monitors this instrument to make sure it’s increasing steadily, that’s when you know everything is good.
This habit ensures the aircraft gets to the speed needed for a safe climb, that’s how important this simple but vital tool is in aviation.
Airspeed Indicator Markings and Ranges
The airspeed indicator (ASI) is a vital flight instrument that gives you the speed of the aircraft. The ASI is marked with various ranges and speeds that are the safe limits for the aircraft. You need to understand these markings and ranges for safe flying.
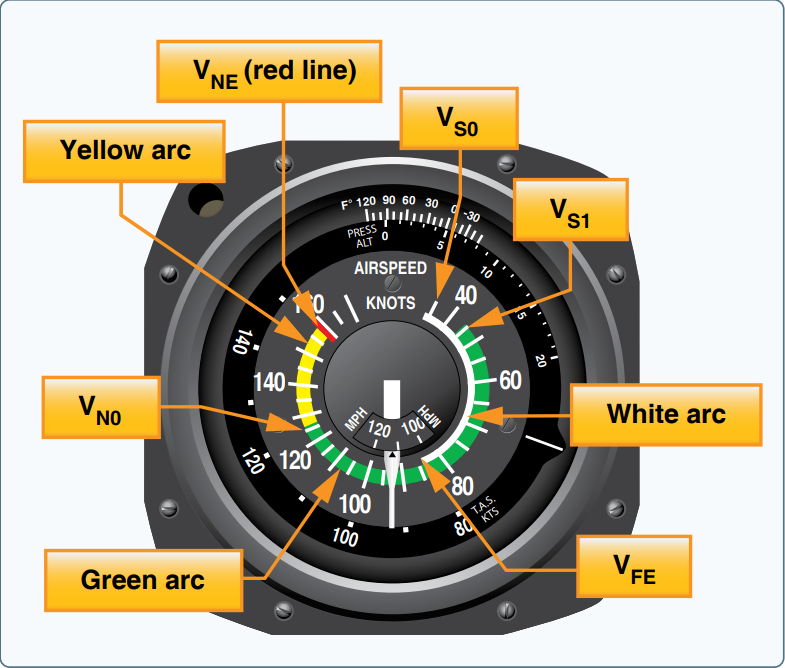
Refer to The Airspeed Indicator Diagram for a visual representation of these critical markings.
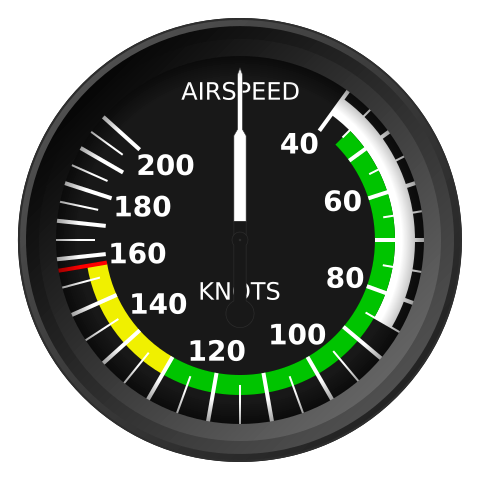
The ASI has several colored arcs and lines, each representing different speed ranges and their safety margins. The green arc is the normal operating range, this is where the aircraft can be safely flown during normal operations. This is where the aircraft performs best, smooth and efficient flying.
The white arc is the flap operating range, this is where the flaps are extended during takeoff and landing. Flying within this range ensures the aircraft is controllable and stable during these critical phases of flight.
The yellow arc or caution range is where you should only fly in smooth air. Pilots must exercise caution when flying in this range to avoid structural stress caused by turbulence or sudden maneuvers.
The red line is the never-exceed speed (VNE), this is the maximum speed beyond which the aircraft’s structure can be damaged. Exceeding this speed can cause severe damage or even failure.
How Airspeed Indicators Work
The airspeed indicator is a vital tool in aviation that shows how fast you are going. It does this by looking at the difference between two types of air pressure: static pressure and total pressure. Static pressure is measured through a static port which measures the air pressure of still air.
The pitot tube measures total or dynamic pressure which is the air pressure when the air is moving. By subtracting the dynamic pressure from the pitot tube and the static pressure from the port, the airspeed indicator gives you an accurate reading of your speed.
It’s finely tuned so it responds predictably to different air pressures.
This means the measurements are accurate so you can make informed decisions and be safe and efficient in flight. It’s part of the full suite of flight instruments.

Reading the Airspeed Indicator
The airspeed indicator is for pilots and has a knot scale. It has one needle that shows the aircraft’s current speed. Pilots get real time data during flight.
It also has colored bands called ‘V’ speeds that show important speed ranges for safety.
Each color represents a different phase of flight or limitation and guides the pilot to fly within the optimal performance range and avoid any critical problems.
Pilots use this instrument to track their airspeed and make adjustments as needed for a smooth and safe flight.
This reliance ensures they operate within the aircraft's safe limits, reinforcing both safety and stability throughout the flight.

Critical Airspeeds and Stalling Speed
Critical airspeeds are important for safe and efficient flying. Stalling speed is the lowest airspeed at which an aircraft can still produce lift to fly.
Going below that speed increases the risk of losing lift and stalling.
Minimum steady flight speed is the lowest airspeed at which an aircraft can fly steady and controlled. That’s the speed at which the aircraft is in balance and the pilot can handle it without losing control.
And finally, the design maneuvering speed and never-exceed speed are the upper limits for flying. Design maneuvering speed is the maximum speed at which the aircraft can be safely maneuvered without structural damage.
Never-exceed speed is to be avoided at all costs to keep the aircraft intact. Pilot awareness of these speeds is critical to safe flying in all phases of flight. And Vy (rate of climb speed) is also important as it gets you to altitude fastest in all phases of flight.

Minimum Steady Flight Speed and Stalling Speed
Minimum steady flight speed is the speed at which an aircraft can be flown steadily and controlled. This is marked on the ASI as VS1. Stalling speed is the speed at which the aircraft will stall, which is the point at which the wing exceeds its critical angle of attack and lift is lost.
Minimum steady flight speed, VS1 on the airspeed indicator, is the speed at which an aircraft can maintain steady, controlled flight. This is important for pilots to know as it’s the threshold below which the aircraft becomes difficult to control. Flying above or at this speed ensures the aircraft is responsive to control inputs and a stable flight.
Stalling speed is the speed at which the wing exceeds its critical angle of attack and lift is lost. This is marked on the ASI as VS0 when clean (flaps and landing gear retracted) and VS1 when configured. Knowing the stalling speed is important for pilots as it helps them avoid situations where the aircraft might accidentally stall and lose control.
Knowing both minimum steady flight speed and stalling speed allows pilots to make informed decisions to fly safely and controlled. These speeds are the boundaries of the aircraft’s operational envelope, safe and efficient flying.
Color-Coded Speeds and Ranges
The color-coded speeds on an airspeed indicator are a visual aid for pilots of all experience to ensure safe flight. The green arc is the normal operating range where the aircraft is performing optimally and safely during normal flight and maneuvers.
Moving into the white arc pilots should be cautious as this is the flap range, takeoff and landing where more control is required. When conditions are less than ideal the yellow arc means caution, flying in this range should only be done in smooth air and avoid sudden gusts or turbulence.
And the red line is the line not to be crossed, the never exceed speed beyond which the aircraft structure will be damaged. Knowing these colors and the airspeed indicator markings will help you make informed decisions to fly safely and efficiently.
Structural Limitations and Landing Gear Extended

Understanding Structural Limitations
Flaps and landing gear are crucial components of an aircraft, but they can be vulnerable to stress if exposed to excessive force. Their design causes them to project into the airflow during operation, meaning any speed beyond their limits could lead to damage.
Monitoring Safe Operations
Pilots have the responsibility to remain vigilant about the limits of these components, ensuring that they operate within safe parameters. This diligence is essential for maintaining the aircraft's performance and avoiding potential hazards.
Role of the Airspeed Indicator
The airspeed indicator is your best friend. With the landing gear extended speed (max speed with gear down) you can fly safe and efficient.
Navigation and Airspeed Indicators
Navigation is all about knowing where you are by measuring speed and distance. This is the key to planning the best route to your destination.
The airspeed indicator is the heart of this process as it gives you the current speed of the aircraft. You use this instrument to calculate how far you’ve gone and how fast you’re getting to your next waypoint.
With accurate airspeed you can navigate with more confidence. This means you’ll get to your destination faster and safer.
Angle of Attack and Lift Reserve Indicators
Angle of attack (AOA) is key for pilots because it determines when an aircraft will stall. Stalls can happen at any speed so just watching the airspeed indicator (ASI) isn’t enough to prevent them.
That’s where the AOA indicator comes in, a vital awareness tool to monitor and anticipate when a stall is about to happen, giving pilots situational awareness.
The critical angle of attack is a specific threshold at which the aircraft will stall. AOA indicators tell you when you’re approaching that threshold so you can adjust and maintain control.
This gives you a smoother, more stable flight by giving you early warning of stall conditions and more flight safety and confidence.
The AOA indicator is complemented by the Lift Reserve Indicator (LRI) which measures the amount of lift being produced by the aircraft. This instrument gives you a clear view of how much lift is available so you can make informed decisions about your flight dynamics. Together the AOA and LRI give you more safety and efficiency in the air.
Common Errors and Misconceptions
Pilots need to understand airspeed, as there are many common mistakes and misunderstandings when not.
As the aircraft climbs higher, air density decreases and engine performance and lift decrease, which affects the indicated airspeed. Air temperature also plays a big part; colder air is denser and provides more lift than warm air.
Pilots must also understand the difference between true airspeed and indicated airspeed, as true airspeed takes into account the thinner air at higher altitudes.
And pressure altitude which changes with barometric pressure affects airspeed readings, so you need to adjust your instruments to navigate correctly. Now you know, you can make good decisions and fly safe and smart.
Best Practices for Safe Flight
To fly safe pilots must know their aircraft’s limits and not exceed them. Knowing these limits helps to control and avoid situations that can compromise safety.
Pilots must stay informed and aware of these limits to have a successful and safe flight.
The airspeed indicator is a critical tool, it guides the pilot to operate within these limits. By monitoring the airspeed continuously pilots can make the necessary adjustments to keep the aircraft stable and safe throughout the flight. This is the pilot’s check not to exceed safe speeds.
Checking the airspeed indicator regularly is as important to ensure the readings are correct and true.
Regular checks allow the pilot to respond quickly and effectively to any airspeed variations. This is key to a safe, smooth and efficient flight, where all passengers feel included.
Conclusion
The airspeed indicator is key to safe flying, it gives you the airspeed data to make informed decisions. Pilots need to know how the instrument works and how to interpret it so you can fly with confidence and precision.
By following best practices and avoiding the common mistakes pilots can create an environment where safety and efficiency wins. That’s good for the journey and good for everyone involved to feel safe and secure during the flight.

